VXLAN Lab
VXLAN 教育訓練
本文將進行在 Linux 系統上建立 VXLAN Tunnel,並且讓不同 Node 上的 Container 可以彼此溝通。
環境描述
客戶需要我進行 Openshift 上網路架構的教育訓練,我決定在課堂上建立一個簡單的 Lab,向他們展現 CNI 的在 Node 上的操作:
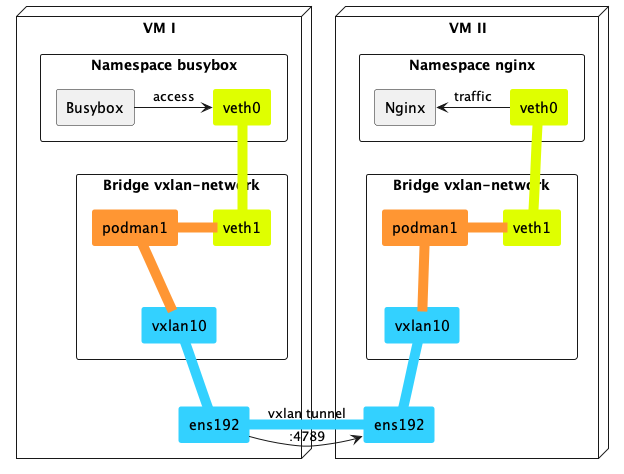
以下是 vm 的 IP 地址,在這個實驗將展示如何透過 vxlan 讓不同 VM 上的 busybox 能夠訪問 nginx:
| name | ip | description |
|---|---|---|
| vm-1 | 10.250.75.150 | 建立 buxybox container |
| vm-2 | 192.168.50.225 | 建立 nginx container |
先決條件
- 每台VM都需要安裝
podman:
dnf install -y podman
- 兩台機器需要能互相溝通, 可以用
ping進行測試。
VM I (10.250.75.150)
- Display network device
[root@vxlan-vm-1 ~]# ip link
1: lo: <LOOPBACK,UP,LOWER_UP> mtu 65536 qdisc noqueue state UNKNOWN mode DEFAULT group default qlen 1000
    link/loopback 00:00:00:00:00:00 brd 00:00:00:00:00:00
2: ens192: <BROADCAST,MULTICAST,UP,LOWER_UP> mtu 1500 qdisc mq state UP mode DEFAULT group default qlen 1000
    link/ether 00:50:56:9b:c9:02 brd ff:ff:ff:ff:ff:ff
    altname enp11s0
- Create vxlan tunnel
ip link add vxlan10 type vxlan id 10 remote 192.168.50.225 dstport 4789 dev ens192
ip link set vxlan10 up
- Set up
podmannetwork
podman network create --subnet=192.55.0.0/24 vxlan-network
- Verify
podmannetwork
[root@vxlan-vm-1 ~]# podman network inspect vxlan-network
[
     {
          "name": "vxlan-network",
          "id": "3485353416f185295472508fa4c5ca081a7aeaf4edf54cf76dd881f6e33e5d26",
          "driver": "bridge",
          "network_interface": "cni-podman1",
          "created": "2024-01-23T14:01:40.175212102+08:00",
          "subnets": [
               {
                    "subnet": "192.55.0.0/24",
                    "gateway": "192.55.0.1"
               }
          ],
          "ipv6_enabled": false,
          "internal": false,
          "dns_enabled": true,
          "ipam_options": {
               "driver": "host-local"
          }
     }
]
- Create a
busybox:1.35.0container
podman run -d --net vxlan-network --name=busybox --ip=192.55.0.2 busybox:1.35.0 tail -f /dev/null
- Add
vxlan10into bridgecni-podman1
ip link set vxlan10 master cni-podman1
- Open a port
4789on the firewall
firewall-cmd --add-port=4789/udp --permanent && firewall-cmd --reload
VM II (192.168.50.225)
- Display network device
[root@vxlan-vm-2 ~]# ip link
1: lo: <LOOPBACK,UP,LOWER_UP> mtu 65536 qdisc noqueue state UNKNOWN mode DEFAULT group default qlen 1000
    link/loopback 00:00:00:00:00:00 brd 00:00:00:00:00:00
2: ens18: <BROADCAST,MULTICAST,UP,LOWER_UP> mtu 1500 qdisc fq_codel state UP mode DEFAULT group default qlen 1000
    link/ether 4e:ec:39:b2:a8:11 brd ff:ff:ff:ff:ff:ff
    altname enp0s18
- Create vxlan tunnel
ip link add vxlan10 type vxlan id 10 remote 10.250.75.150 dstport 4789 dev ens18
ip link set vxlan10 up
- Set up
podmannetwork
podman network create --subnet=192.55.0.0/24 vxlan-network
- Verify
podmannetwork
[root@vxlan-vm-2 ~]# podman network inspect vxlan-network
[
     {
          "name": "vxlan-network",
          "id": "3485353416f185295472508fa4c5ca081a7aeaf4edf54cf76dd881f6e33e5d26",
          "driver": "bridge",
          "network_interface": "cni-podman1",
          "created": "2024-01-23T06:53:17.309468616-05:00",
          "subnets": [
               {
                    "subnet": "192.55.0.0/24",
                    "gateway": "192.55.0.1"
               }
          ],
          "ipv6_enabled": false,
          "internal": false,
          "dns_enabled": true,
          "ipam_options": {
               "driver": "host-local"
          }
     }
]
- Create a
nginx:1.25.3container
podman run -d --net vxlan-network --name nginx --ip=192.55.0.3 nginx:1.25.3
- Add
vxlan10into bridgecni-podman1
ip link set vxlan10 master cni-podman1
- Open a port
4789on the firewall
firewall-cmd --add-port=4789/udp --permanent && firewall-cmd --reload
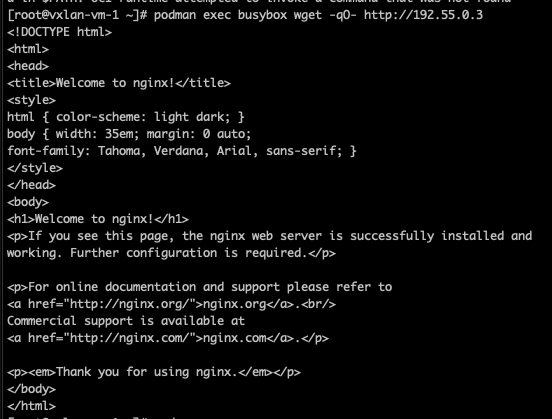
Verify the connection
- Access
nginxonVM IIfrombusyboxonVM Iusingwget
podman exec busybox wget -qO- http://192.55.0.3
- Verify the response
index.html
[root@vxlan-vm-1 ~]# podman exec busybox wget -qO- http://192.55.0.3
<!DOCTYPE html>
<html>
<head>
<title>Welcome to nginx!</title>
<style>
html { color-scheme: light dark; }
body { width: 35em; margin: 0 auto;
font-family: Tahoma, Verdana, Arial, sans-serif; }
</style>
</head>
<body>
<h1>Welcome to nginx!</h1>
<p>If you see this page, the nginx web server is successfully installed and
working. Further configuration is required.</p>

<p>For online documentation and support please refer to
<a href="http://nginx.org/">nginx.org</a>.<br/>
Commercial support is available at
<a href="http://nginx.com/">nginx.com</a>.</p>

<p><em>Thank you for using nginx.</em></p>
</body>
</html>
以上就是讓身處 2 個不同 VM 上的 container 間透過 vxlan 互相溝通的實驗。
結果
以下是在 VM I container 上使用 wget 訪問 VM II container 的結果:
手動建立 Bridge 及 VETH 的實驗
我們也可以在不同 VM 上建立 veth,模擬 Container 的情況,請先參考上面的步驟,在兩台 VM 上建立 vxlan 的 link
- Create
bridgedevice onVM I&VM II
ip link add name br-vx type bridge
ip link set br-vx up
- Create VETH Pair
ip link add type veth
- Add
veth0into bridgebr-vx
ip link set veth0 master br-vx
ip link set veth0 up
- Add
vxlan10into bridgebr-vx
ip link set vxlan10 master br-vx
- Configure
veth1IP address (onVM I)
ip addr add 192.66.0.1/24 dev veth1
ip link set veth1 up
- Configure
veth1IP address (onVM II)
ip addr add 192.66.0.2/24 dev veth1
ip link set veth1 up
- 在
VM I上測試
[root@vxlan-vm-1 ~]# ping 192.66.0.2
PING 192.66.0.2 (192.66.0.2) 56(84) bytes of data.
64 bytes from 192.66.0.2: icmp_seq=1 ttl=64 time=0.933 ms
64 bytes from 192.66.0.2: icmp_seq=2 ttl=64 time=0.914 ms
64 bytes from 192.66.0.2: icmp_seq=3 ttl=64 time=0.988 ms
64 bytes from 192.66.0.2: icmp_seq=4 ttl=64 time=0.895 ms
64 bytes from 192.66.0.2: icmp_seq=5 ttl=64 time=1.05 ms
- 在
VM II上測試
[root@vxlan-vm-2 ~]# ping 192.66.0.1
PING 192.66.0.1 (192.66.0.1) 56(84) bytes of data.
64 bytes from 192.66.0.1: icmp_seq=1 ttl=64 time=1.04 ms
64 bytes from 192.66.0.1: icmp_seq=2 ttl=64 time=0.924 ms
64 bytes from 192.66.0.1: icmp_seq=3 ttl=64 time=0.846 ms
64 bytes from 192.66.0.1: icmp_seq=4 ttl=64 time=1.25 ms
64 bytes from 192.66.0.1: icmp_seq=5 ttl=64 time=1.36 ms